_edited_edited.png)
Choosing the Right Metallic Epoxy Colors
- Jan 30
- 4 min read
What if the most beautiful surface in your home wasn't wood or tile, but a liquid you pour from a bucket? That's the stunning reality behind metallic epoxy floors---flowing, three-dimensional designs that mimic molten metal, swirling galaxies, or polished marble. Unlike a simple coat of paint, these unique floors are created by mixing special, shimmery pigments into a clear, liquid epoxy resin. When poured, the blend hardens into a durable, seamless surface with mesmerizing depth, creating a one-of-a-kind piece of art right under your feet. This is often what people mean when they ask, "what is 3D epoxy flooring?" Beyond the looks, it's a practical and durable choice for garages, basements, and more.
What Is a Metallic Epoxy Floor Actually Made Of
A metallic epoxy floor begins as two liquids: a clear resin and a hardener. When mixed, a chemical reaction transforms them into an incredibly hard, durable surface that bonds directly to the concrete beneath it, creating a seamless foundation.
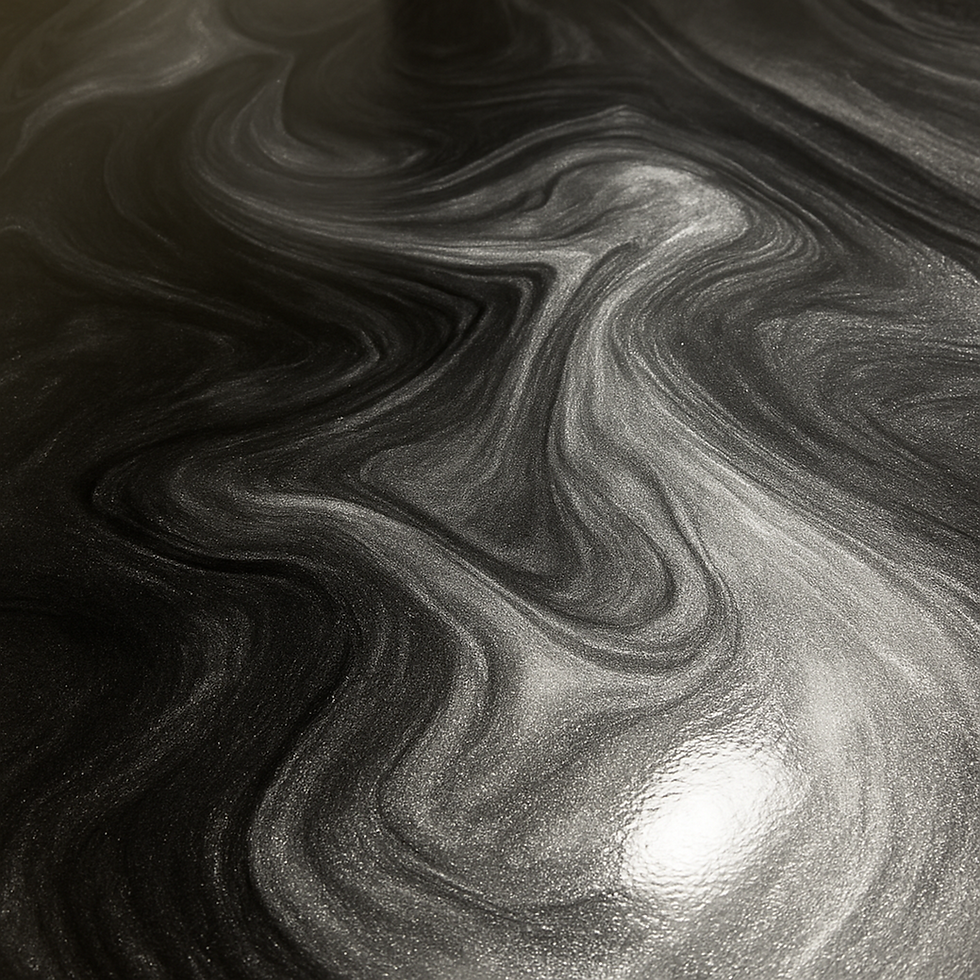
The stunning, three-dimensional look comes not from flakes of metal, but from special epoxy resin pigments for flooring---extremely fine, shimmery powders similar to an artist's pigment. These powders are stirred into the clear epoxy before it's poured, infusing the mixture with a pearlescent, light-catching quality that gives the floor its signature depth and motion. When this pigmented epoxy is poured, the artistry unfolds. The thick liquid flows, allowing the tiny metallic particles to drift and settle into unique, river-like patterns. Because this swirling design is locked in place as the epoxy hardens, or "cures," no two floors are ever identical. The result is a seamless work of art built for everyday life.
The Real Pros and Cons: Is Metallic Epoxy Flooring Durable
One of the biggest advantages of metallic epoxy is its seamless surface. With no grout lines or joints to trap grime, cleaning is incredibly simple. Spills like car oil or tracked-in mud can't seep in and stain, so they wipe away easily. This non-porous, wall-to-wall seal makes epoxy a top choice for finishing basements and garages, where moisture and messes are common.
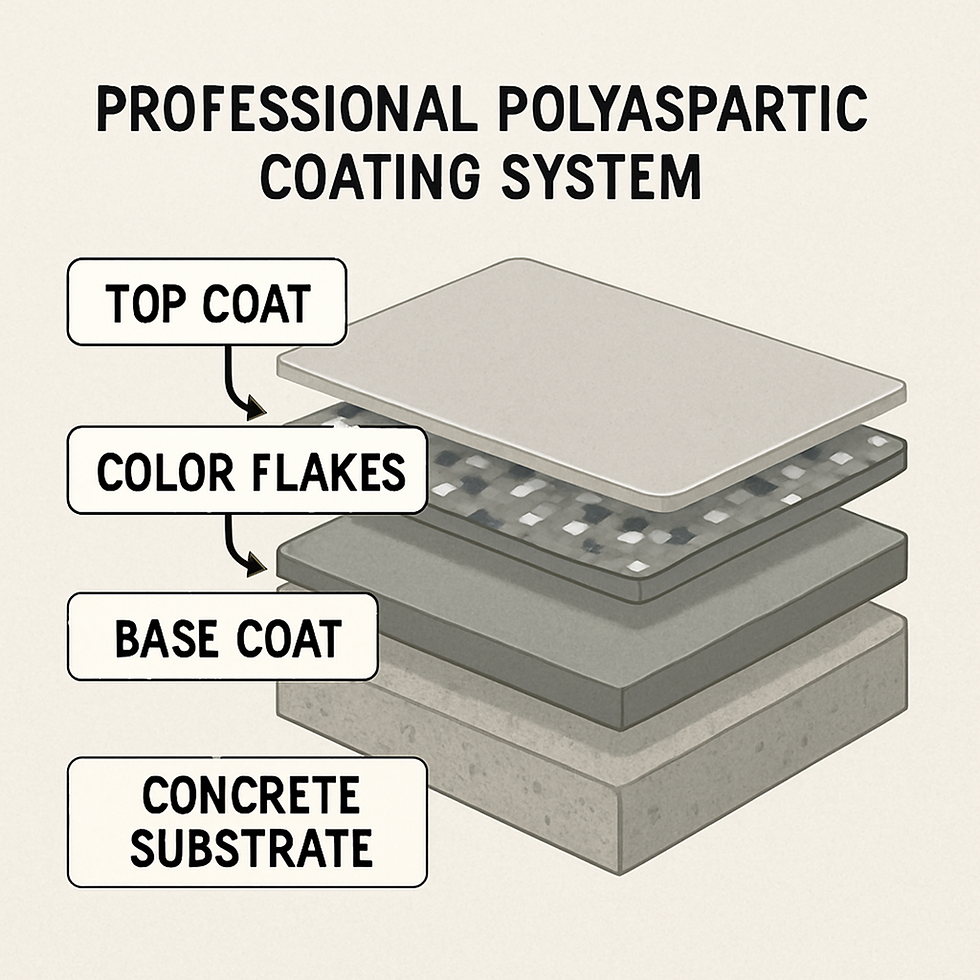
However, no floor is indestructible. The main challenges revolve around two things: scratches and slipperiness. While the floor itself is very hard, dragging heavy furniture or sharp objects can create scratches. To address this, every professional installation is finished with a crucial final layer: a clear topcoat, also known as a sealer.
This topcoat acts like the clear coat on a car---a transparent, sacrificial layer that takes daily wear and tear, protecting the beautiful design beneath. This sealer is the key to long-term durability, providing essential scratch resistance and often including additives for extra grip to make the surface less slippery when wet.
How to Choose Metallic Epoxy Color Combinations for Your Space
Choosing your metallic epoxy color combinations is where the fun begins. A simple rule is to consider how color affects a room's perceived size. Lighter shades like pearl white or soft silver reflect light, making a small basement feel larger and more open. Conversely, a dramatic charcoal or deep blue adds a luxurious, high-end feel to a spacious living area, turning the floor into a bold statement piece.
Beyond the basic hue, you'll decide on complexity. A single color, like gunmetal gray infused with shimmering epoxy resin pigments for flooring , creates a sophisticated "molten metal" effect. For a more dynamic result, combining two or three colors can produce a natural stone or marble look. This artistic freedom is a key benefit of metallic epoxy vs polished concrete, which offers a more uniform, industrial finish.
Finally, match the colors to your room's function. A popular garage choice is a charcoal-and-silver blend that looks clean while hiding tire marks. For a laundry room, a bright white-and-pearl mix feels fresh and energizing. Consider your wall colors and furniture to ensure the floor complements the space, not competes with it.
What Is the Real Cost to Install a Metallic Epoxy Floor?
The professional cost to install an epoxy metallic floor typically ranges from $7 to over $15 per square foot, placing it in a similar category to high-end tile or polished concrete. While project size and design complexity affect the price, the biggest variable isn't the material itself.
Surprisingly, the most significant factor driving the cost is floor preparation for epoxy coating. A pristine finish requires a perfectly smooth and clean concrete slab underneath. If your floor is cracked, stained, or uneven, a professional will spend considerable time grinding, patching, and cleaning it. This intensive labor makes up a large portion of the final bill.
This is why the cost of metallic epoxy vs. polished concrete can be similar, as both demand an impeccable starting surface. More intricate, multi-color designs will also land on the higher end of the cost spectrum.
DIY vs. Pro: Should You Install a Metallic Epoxy Floor Yourself?
With professional costs in mind, a DIY metallic epoxy installation guide can seem tempting. However, applying epoxy is a one-shot chemical process with permanent results. It's not like painting a wall where you can take a break. Once the resin and hardener are mixed, a chemical reaction starts a timer known as "pot life," giving you just 30-45 minutes to work. Within this brief window, you must pour and spread the material perfectly. Any mistakes in the crucial floor preparation for epoxy coating, like a missed oil spot, can cause permanent blemishes like peeling or "fish eyes" (craters in the finish) that get sealed in forever.
For this reason, even the best metallic epoxy floor kits for DIY are better for smaller projects. For a large garage or basement floor where a flawless finish is the goal, hiring a professional is the surest way to avoid a costly and irreversible mistake.
Your Next Steps to a Show-Stopping Floor
Now that you understand the benefits and process behind metallic epoxy, you can move from inspiration to action. Here's a simple three-step plan to get started:
1. Assess Your Space: Decide on the location and measure the square footage to create a realistic budget estimate.
2. Gather Inspiration: Save your favorite photos of colors and patterns to create a clear vision.
3. Talk to the Pros: Contact Raz-Barry Construction and get detailed quotes for your project.


Comments