_edited_edited.png)
Complete Guide to Concrete Floor Coatings
- Mar 19
- 14 min read
You sweep your garage floor on Saturday, yet by Sunday morning, a fine layer of grey powder has already settled on your car's hood. It feels like endless dirt, but that powder is actually your floor slowly falling apart. Concrete is not the impenetrable rock we often imagine; it acts more like a very hard sponge with a surface that crumbles over time. This natural breakdown, known as concrete dusting, is the primary reason homeowners finally decide to upgrade their floors. A high-quality floor coating stops this disintegration at the source, sealing the surface so that the only dirt in your garage is what you track in from the driveway.

Many people use the terms "paint" and "coating" interchangeably, but the difference in performance is massive. Think of the difference between a seasoned cast-iron skillet and a modern non-stick pan. Standard masonry paint merely sits on top of the slab like a sticker, often peeling up the moment a hot tire parks on it. A true coating penetrates the porous surface—the tiny holes in the concrete—and cures into a solid, seamless layer. This chemical bond creates a barrier that repels oil spills, resists staining, and wipes clean with a simple damp mop.
Beyond easy maintenance, the right system fundamentally changes how you perceive the space. Raw concrete absorbs light, making basements and workshops feel dark and cave-like even with the lights turned on. By applying a glossy, light-reflective finish, you can effectively double the brightness in the room without adding a single lightbulb. This increased visibility makes the environment safer for working with tools and significantly more inviting for everything from laundry to hobbies.
Achieving this showroom-quality finish, however, requires more than just rolling a liquid out of a bucket. Industry pros live by a simple rule: a successful floor is 90% preparation and only 10% product. From grinding the surface to choosing between epoxy and polyaspartic systems, understanding the process is the best way to ensure your investment lasts for years.
The 'Hard Sponge' Problem: Why Bare Concrete Damages Your Property
Even though your garage floor feels solid like rock, it behaves more like a stiff sponge. This natural porosity allows moisture, oils, and chemical spills to seep deep below the surface rather than sitting harmlessly on top. Once those fluids penetrate the slab, they become nearly impossible to remove, leading to persistent musty odors or dark splotches that no amount of scrubbing can erase.
Winter weather turns this absorption from an annoyance into a structural hazard through the "freeze-thaw cycle." When water trapped inside the concrete’s pores freezes, it expands by about 9%, creating internal pressure that forces the surface to flake off or crack—a process known as spalling. Without effective concrete floor coatings to act as a barrier, this seasonal expansion acts like a slow-motion jackhammer from the inside out.
Beyond water damage, unsealed floors remain vulnerable to everyday chemical attacks that leave permanent scars. Common household liquids that ruin the look of bare concrete include:
● Motor oil: Creates deep, dark shadows that "wick" back up to the surface over time.
● Brake fluid: Can chemically dissolve the cement paste at the surface.
● Rust: Transfers quickly from damp metal tools or old paint cans.
Stopping this damage requires more than a simple wash; it demands the right barrier. The next step is navigating the menu of floor coating solutions and concrete sealers to find the right shield for your space.
Selecting the Right Shield: Comparing Epoxy, Polyaspartic, and Acrylic Sealers
Walking down the aisle of a home improvement store presents a confusing mix of "concrete paints" and "heavy-duty kits," but the key difference lies in how they harden. Standard acrylic sealers merely dry through evaporation, much like wall paint, leaving a thin film that sits passively on the surface. In contrast, durable floor coatings like epoxy and polyaspartic undergo a chemical reaction called "cross-linking." Think of this as a liquid turning into a solid chain-link fence; once it cures, it becomes structurally stronger than the concrete beneath it.
While basic sealers offer a quick cosmetic fix, they often fail the "hot tire test." When rubber tires heat up from driving, they expand the pores of a painted floor; as they cool, they contract and pull the paint up like a scab. Epoxy floor coatings solve this by bonding tightly to the slab, though they can yellow under sunlight and take days to harden. For a premium upgrade, comparing epoxy vs polyaspartic floor coatings reveals a clear winner in speed and UV stability: polyaspartics cure in hours and won't fade, making them the choice for professional one-day installs.
Choosing the right tier depends entirely on your traffic needs and maintenance goals:
● Acrylic Sealers: 1–2 years (Low cost, cosmetic only)
● Epoxy Systems: 5–10 years (Medium cost, high durability)
● Polyaspartic Coatings: 15+ years (Higher cost, maximum resistance)
Regardless of which material you choose, the chemistry will fail if it cannot grip the surface.
The Hidden Science of Adhesion: Why 90% of a Great Floor Happens Before the First Pour
Most homeowners assume a smooth garage floor is the perfect canvas, but in the world of adhesion, smoothness is the enemy. Imagine trying to stick heavy duct tape to a dusty chalkboard; it might hold briefly, but the slightest tug pulls it free. Concrete coatings rely on a "mechanical bond," meaning the liquid resin needs rough valleys to flow into and lock against as it hardens. If the surface is too slick, the material sits on top like a floating sheet of ice, waiting to crack or peel under the weight of your vehicle.
To create this necessary grip, you must remove "laitance," a weak, powdery layer of cement dust that rises to the top when concrete initially cures. Professionals use diamond grinding concrete surface profile techniques to shave off this fragile cap and expose the strong, open pores underneath. This process transforms a slick slab into a texture resembling coarse sandpaper, technically known as a Concrete Surface Profile (CSP) of 2 or 3. Without this gritty texture, even industrial-grade epoxy has nothing to clamp onto physically.

Achieving this specific roughness is the most labor-intensive part of the job, often taking longer than the application itself. While some DIY kits suggest a simple acid wash, that method rarely cuts deep enough for permanent results. Proper surface preparation for concrete painting ensures the material fuses with the slab structurally, preventing the coating from lifting when your tires heat up in the summer.
Stopping 'Hot Tire Pickup' and Peeling: The Role of Surface Profiling
Parking a vehicle seems harmless, but your tires act like massive heat sinks after a highway drive. As the hot rubber rests on the cool surface, the tire expands slightly while the coating beneath it softens from the sudden temperature spike. When the rubber eventually cools and contracts, it grips the finish with incredible force, creating the specific surface tension responsible for the dreaded "hot tire pickup."
If the coating is merely sitting on top of a smooth surface, that tension will rip it right off the concrete like a sticker peeling off backing paper. Preventing hot tire pickup on garage floors requires that deep, sandpaper-like texture discussed earlier, which acts like thousands of tiny anchors holding the material down. Professional garage floor epoxy coating systems are formulated to flow into these crevices, creating a mechanical lock so strong that the tire rubber will often tear before the floor coating lets go.
Even without a car parked on it, your slab constantly expands and shrinks with seasonal temperature changes. A chemical bond alone rarely survives this movement, but a mechanical "key" allows the coating to move with the concrete rather than shearing away. With the surface successfully anchored against heat and friction, you must next ensure nothing is attacking the bond from underneath.
Is Your Slab 'Breathing' Too Much? Testing for Moisture Before You Coat
Concrete looks solid to the naked eye, but it actually behaves more like a dense, hard sponge. Ground moisture naturally travels up through the porous slab in a process called moisture vapor transmission. If you seal the surface with an impermeable cap—like a thick epoxy—that rising vapor gets trapped. Without anywhere to go, the hydrostatic pressure builds up underneath until it forces the coating off, creating ugly liquid-filled bubbles or causing large sections to pop loose entirely.
You don't need expensive lab equipment to spot a major problem; a simple plastic sheet test works for most residential floors. Tape a 2x2 foot square of heavy clear plastic to the floor, sealing all edges with duct tape to make it airtight, and wait 24 to 48 hours. When you peel it back, look for these warning signs:
● Darkening of the concrete caused by dampness.
● Beads of water clinging to the underside of the plastic.
● White, salty powder residue on the surface (efflorescence).
If your test reveals significant moisture, standard concrete floor coatings will likely fail. This doesn't mean you can't coat the floor, but you must apply a specialized primer known as a moisture vapor barrier for slabs first to manage that pressure. Once you have confirmed the slab is dry enough or properly primed to handle the vapor, you can turn your attention to the visible imperfections on the surface.

Repairing Cracks and Divots: Creating a Level Playing Field for Your Coating
Many homeowners assume thick epoxy acts like a magic wand over pits, but floor coating solutions actually behave like a magnifying glass. As the liquid cures, it settles into every imperfection in a process called "telegraphing," making every divot visible through the shiny finish. To avoid this, you must use a hard-curing concrete mending paste rather than soft caulks or wood fillers, which will compress under pressure and eventually ruin the bond.
Fixing a hairline fracture effectively often requires making it look worse before it gets better. "Chasing the crack" involves using an angle grinder to cut a V-shape into the fissure, creating clean edges for the filler to grip. Like a dentist drilling out a cavity before filling it, you must open the space to ensure the patch anchors permanently into the slab rather than just sitting on the dusty surface.
Distinguish carefully between accidental breaks and the straight "control joints" designed to let the slab naturally expand and contract. Repairing cracks before floor coating creates a smooth canvas, but filling these active joints with rigid material can force the concrete to crack elsewhere. With the floor patched and ground flat, you are ready to compare the chemical heavyweights that will protect your work.
The Heavy Hitter: Why Professional Epoxy Garage Systems Outlast DIY Kits
Most homeowners treat floor coating like wall painting, but durability depends entirely on "solids content." When you apply standard DIY paint, nearly 60% of the liquid evaporates as water or solvents, leaving a shrunken, thin film. In contrast, industrial floor coatings rated as "100% solids" do not shrink. If you pour one gallon of liquid onto the floor, you get exactly one gallon of cured protection, resulting in a dense shield that resists peeling.
To understand what you are buying, compare the three main categories of epoxy bases:
● Water-Based Epoxy: Easy to apply but very thin (1–3 mils); often peels under hot tires.
● Solvent-Based Epoxy: Stronger bond but releases hazardous fumes; moderate thickness (4–6 mils).
● 100% Solids Epoxy: The professional standard; odor-free and cures to a thick, armor-like finish (10+ mils).
Professional installers measure this protective layer in "mils," where one mil equals 1/1000th of an inch. While a cheap epoxy garage kit creates a film thinner than a sheet of paper, professional systems build a surface roughly the thickness of a credit card. That extra depth provides the sacrificial layer needed to withstand dropped wrenches, dragging kickstands, and years of foot traffic without wearing through to the bare concrete.
Density also determines how well the floor handles chemical attacks. Garage floor epoxy coating systems with high solids content create a non-porous barrier that repels gasoline, motor oil, and battery acid, allowing you to wipe up spills without staining. However, even the toughest epoxy has an Achilles' heel: it will yellow significantly when exposed to sunlight. To solve this UV problem, we must look at the next evolution in coating technology.
Speed and UV Resistance: When to Choose Polyaspartic Over Epoxy
While epoxy creates a rock-hard foundation, it behaves like an old plastic lawn chair when left in the sun: it eventually turns a sickly amber color. This is where polyaspartic technology steps in as the essential topcoat. Originally developed for industrial bridges to prevent steel corrosion, this material is completely UV stable. If you are coating a driveway, a patio, or a garage that receives heavy afternoon sun, UV stable outdoor concrete coatings ensure your slate gray floor stays gray rather than turning yellow, preserving that showroom look for decades.
Time is the other major trade-off for homeowners. Standard epoxy takes days to cure fully, leaving your garage off-limits and your belongings on the lawn for up to a week. Polyaspartic coatings cure rapidly, often allowing for a "one-day install" where you can walk on the floor in just a few hours and park your car the next day. This rapid reaction time makes it difficult for a first-time DIYer to apply without mistake, but for a busy household, the quick return to service is invaluable.
When comparing epoxy vs polyaspartic floor coatings, think of polyaspartic as the high-performance shield that protects the epoxy base. It generally costs more per square foot, but it offers specific performance advantages that standard epoxy cannot match:
● Extreme Durability: Up to 4x more abrasion resistant than epoxy.
● Sunlight Protection: 100% UV stable (non-yellowing).
● All-Weather Application: Installs in temperatures as low as -20°F.
With the protective chemistry sorted, the next decision is visual. Clear coats provide the armor, but to hide concrete imperfections and add grip, you need to introduce texture.
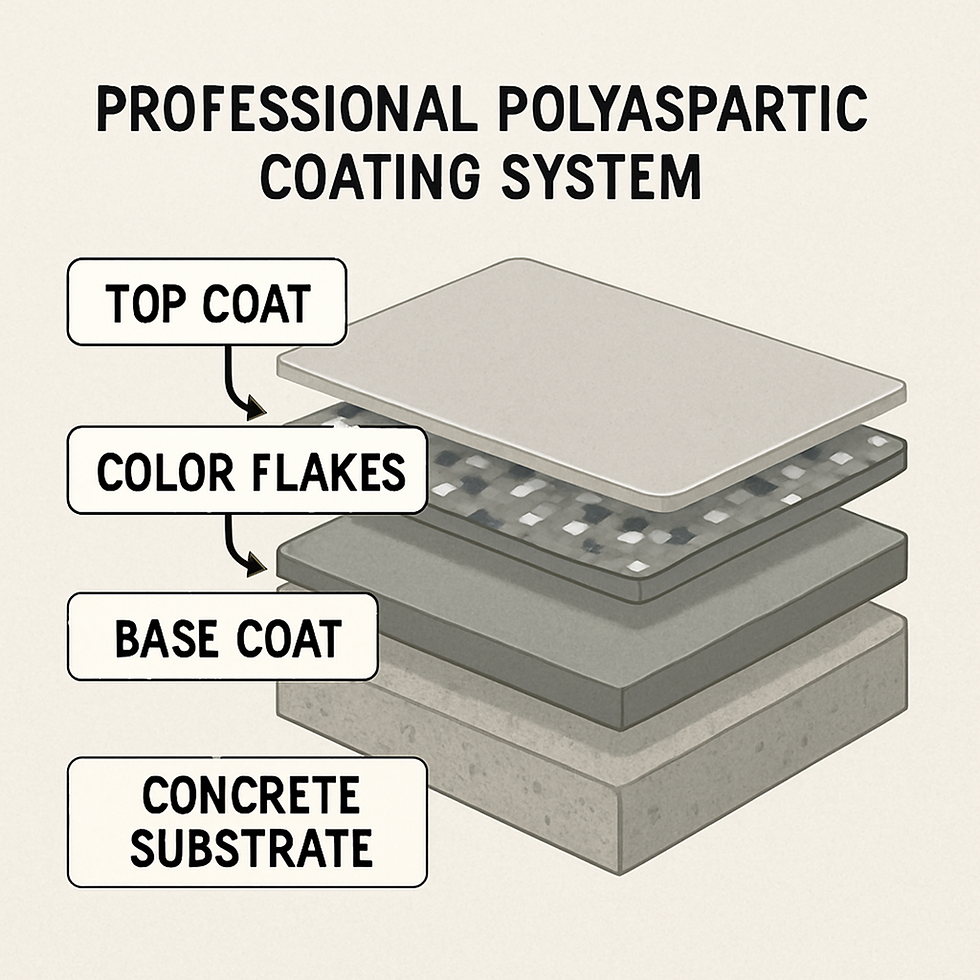
Aesthetic Upgrades: Using Decorative Flakes and Anti-Slip Additives
Applying a solid color often highlights every minor crack in your concrete, acting like a spotlight on existing imperfections. This is where decorative flake floor finishes provide a crucial benefit: they add visual style while effective camouflaging the substrate. By broadcasting vinyl chips into the wet base coat until the floor is completely covered—known as a "full broadcast"—you create a terrazzo-like appearance that completely hides patching repairs or uneven spots. This technique transforms a scarred garage slab into a uniform, showroom-quality surface that forgives the inevitable wear and tear of daily life.
Safety is equally important, as high-gloss coatings can become dangerously slick when introduced to rain or melting snow. To prevent your garage from turning into an ice rink, professionals mix slip resistant additives for concrete floors directly into the topcoat. These additives range from mild polymer beads that feel like orange peel to aggressive aluminum oxide grit. Choosing the right texture ensures you can walk confidently in wet boots without the surface becoming so rough that it shreds your mop during cleaning.
Adding these textured layers also increases the total thickness of the system, creating a shield significantly more impact-resistant than simple paint. The best concrete floor coatings integrate these decorative and functional layers to withstand dropped wrenches and hot tires alike. However, moving from a basic paint kit to a multi-layered, full-broadcast system involves a distinct jump in material volume, leading to the biggest question for most homeowners: does the price tag justify the longevity?
The Cost Reality: Calculating Price Per Square Foot vs Long-Term ROI
Evaluating the price tag requires looking beyond the initial purchase price to the expected lifespan of the floor. While a $200 box from a hardware store seems like a bargain, these thin layers often fail within two years, leading to peeling and frustration. In contrast, the cost per square foot for professional coating generally lands between $5 and $9, depending on your location and the floor's condition. This investment buys you industrial-grade preparation and materials designed to last 15 to 20 years, shifting the math from a recurring maintenance expense to a one-time value addition for your home.
Trying to save money upfront frequently leads to the most expensive mistake in flooring: having to pay a pro to remove a failed DIY attempt later. Grinding off cheap, peeling epoxy is labor-intensive, often adding $2 to $3 per square foot in "stripping costs" compared to coating raw concrete. To avoid paying twice, consider the total upfront investment required for a durable finish:
● Professional Installation: $5–$9 per sq. ft. (includes labor, materials, and warranty).
● DIY High-Solids Kit: $1.50–$3 per sq. ft. (materials only).
● Equipment Rental: $200–$400 per day (diamond grinder and HEPA vacuum).
Ultimately, the Return on Investment (ROI) comes down to cycle time. A high-quality polyurea or epoxy system serves as the best concrete sealer for high traffic areas because it resists hot tire pickup and road salts for decades, not months. Whether you decide to hire a crew or rent a grinder yourself, the longevity of that investment relies entirely on what happens before the first drop of resin hits the floor.
Application Day: A Step-by-Step Walkthrough of a Professional Installation
Once the mixing drill stops, the clock starts ticking immediately. Unlike standard wall paint that can sit in a tray for hours, professional floor systems rely on a rapid chemical reaction that generates heat. This creates a strict window known as "pot life," often as short as 15 to 20 minutes before the liquid turns into a solid rock in your bucket. Working efficiently is essential because once that chemical alarm goes off, you cannot pause; you must get the product applied or risk losing the batch entirely.
Pouring the mixed resin requires a specific technique called "ribboning" to ensure consistent coverage. Instead of dumping the entire bucket in one spot, which creates thick puddles that cure too fast, you pour the coating out in long, thin lines across the concrete. This is where professional installers use a specific tool: spiked shoes. Strapping these cleats over your work boots allows you to walk directly on the wet surface to manipulate the material without leaving footprints, ensuring you can reach every corner without trapping yourself in the room.
After spreading the material, the final critical step involves "back-rolling" to unify the texture. This means rolling over the wet surface a second time in a perpendicular direction to eliminate roller marks and release trapped air bubbles. Executing this step correctly largely determines how long does concrete coating last, as it ensures the layer thickness is uniform across the entire slab. With the application complete, the focus shifts from physical labor to patience, as proper curing is the final requirement before you can learn to maintain your new garage coatings.
Post-Installation Care: How to Clean and Maintain Your Coated Floor for 20+ Years
Protecting that showroom shine is surprisingly simple, but many homeowners accidentally dull their floors by "over-cleaning." Unlike bare concrete that absorbs oil, a coated surface creates a non-porous shield where dirt sits on top. This means you generally don't need heavy scrubbing; you simply need to remove the surface grit that acts like sandpaper under your shoes. A soft microfiber mop is your best daily defense, efficiently grabbing dust without scratching the glossy finish.
When wet washing becomes necessary for cleaning and maintaining coated concrete, the solution you choose determines whether the floor stays clear or turns cloudy. Avoid soap-based detergents found at grocery stores, as they leave a sticky film that traps dirt and dulls the reflection. Instead, build a dedicated maintenance kit containing:
● Microfiber dust mop: To trap loose debris before it grinds into the surface.
● pH-neutral cleaner: Solutions like Simple Green or diluted ammonia cut grease without leaving residue.
● Foam squeegee: To pull dirty water off the floor instantly, preventing water spots.
Even the strongest industrial finishes eventually show wear paths in active homes. While the best concrete sealer for high traffic areas is designed to resist deep scratches, you may notice a loss of gloss after a decade of use. Fortunately, this rarely requires a full removal; a professional "top-coat refresh"—lightly sanding the surface and applying a new clear layer—can often restore the finish to brand-new condition.
Your 3-Step Action Plan for a Lifetime Concrete Floor
Viewing concrete floor coatings as simple paint jobs is a common mistake, but you now possess the insight to distinguish a short-term cosmetic fix from a permanent structural upgrade. Instead of being swayed by flashy DIY kit packaging or vague contractor promises, you can critically evaluate the durability and preparation methods required for your specific space. You no longer just see a dusty slab; you see a potential asset that requires the right chemistry to survive hot tires, oil spills, and heavy foot traffic.
Break any lingering paralysis by analysis with a single physical step: tape a square of plastic to your concrete for twenty-four hours to check for trapped moisture. Once you understand your substrate's condition, challenge potential contractors—or yourself—on the three pillars of success: heavy mechanical grinding equipment, specific moisture mitigation plans, and clear warranty terms against peeling. Whether hiring a pro or managing the project yourself, always prioritize the surface profile over the product brand, as mechanical bonding remains the non-negotiable secret to longevity.
Investing energy in this groundwork today ensures you will not be scraping peeling flakes off your floor next summer. By respecting the science behind adhesion, you are building a showroom-quality foundation that elevates your home’s value and wipes clean effortlessly. Step onto your new floor with confidence, knowing it is built to withstand everything life throws down. For professional services, contact Raz-Barry Construction for all your concrete coating needs.


Comments