_edited_edited.png)
Epoxy Flooring: Options, Benefits, Costs, and Installation for Commercial & Industrial Spaces
- Apr 4
- 8 min read
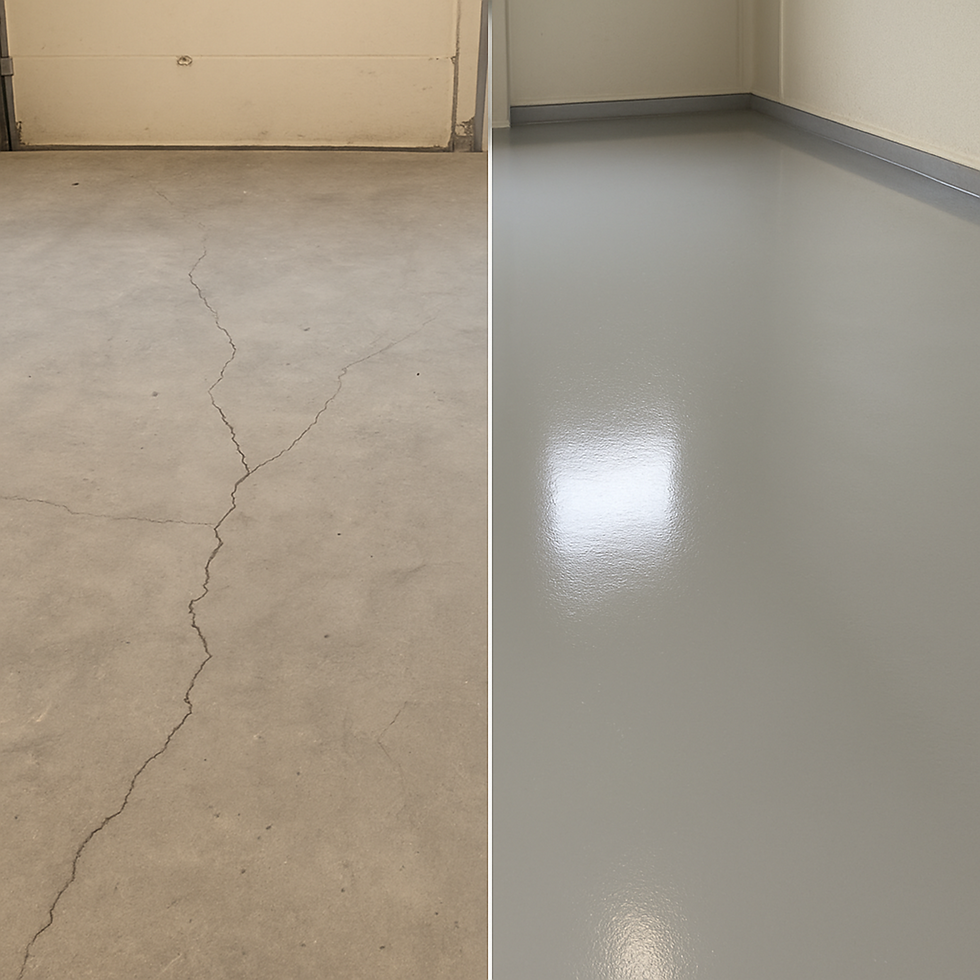
You’ve likely walked into a local boutique or a neighbor's garage and marveled at those showroom floor coatings that look like polished glass. While raw concrete appears completely indestructible, the reality of its structure is quite different. Without proper protection, an untreated slab acts just like a dense sponge. Because of the natural porosity of concrete, it constantly absorbs ground moisture, traps dark oil drips, and breaks down at the surface to create an endless layer of fine, grey dust.
Think of resinous coatings not as standard house paint, but as a customized suit of armor for that vulnerable sponge. As industry data reveals, a true epoxy system isn't a structural floor itself; rather, it is a two-part chemical layer that anchors directly into your existing slab. Once the mixture cures into a hard plastic, this barrier delivers three main benefits: it stops raw deterioration in its tracks, forms a shield against everything from hot car tires to dropped wrenches, and provides immense aesthetic value.
Upgrading a deteriorating slab requires understanding exactly what makes these materials lock into place. Whether you are researching heavy-duty commercial floor coatings or weighing the realistic risks of a weekend DIY project, grasping how epoxy flooring works, what it costs, and why preparation matters most is essential for a successful application.
It’s Not Just Thick Paint: Understanding the Chemical Marriage of Resin and Hardener
People often look at a glossy garage floor and assume it is just a specialized, incredibly thick paint. However, true epoxy flooring comes in two separate containers: a liquid resin and a hardener. Mixing these two parts together doesn't just stir up color; it triggers a chemical marriage that transforms the mixture from a liquid into a dense, impact-resistant plastic.
Unlike standard paint that simply dries as moisture evaporates into the air, epoxy hardens through a process called curing. Since this is an active chemical reaction, the clock starts ticking the second those two parts touch. This limited working window is known as "pot life," meaning you only have a short time to apply the material before it solidifies right in the bucket.
That resulting structural strength is why a dropped wrench won't leave a crater on your floor. While single-can products often peel under hot car tires, commercial grade epoxy locks permanently onto your concrete base. This tough curing chemistry explains why industrial epoxy flooring brings factory durability home, setting the perfect foundation for turning workspaces into showrooms.
Turning Workspaces into Showrooms: The Best Commercial Epoxy Floor Coatings for High-Traffic Areas
Have you noticed how bright a professional workspace looks despite heavy daily traffic? A commercial epoxy floor coating doesn't just protect concrete; it completely transforms the room. The highly reflective cured surface bounces ambient light around, making dimly lit spaces feel vibrant and welcoming. Plus, its incredible impact resistance means heavy tools bounce off the floor instead of leaving permanent craters.
Tailoring this tough foundation to specific areas is where the magic happens. Different environments require unique protective features to perform at their best:
● Retail Shops: Glossy, seamless finishes highlight merchandise while easily enduring endless daily foot traffic.
● Auto Shops: The best floor coating for auto shop use permanently resists harsh oil stains and hot tire friction.
● Offices: Durable office floor coatings eliminate dusty grout lines, dramatically lowering long-term cleaning and maintenance costs.
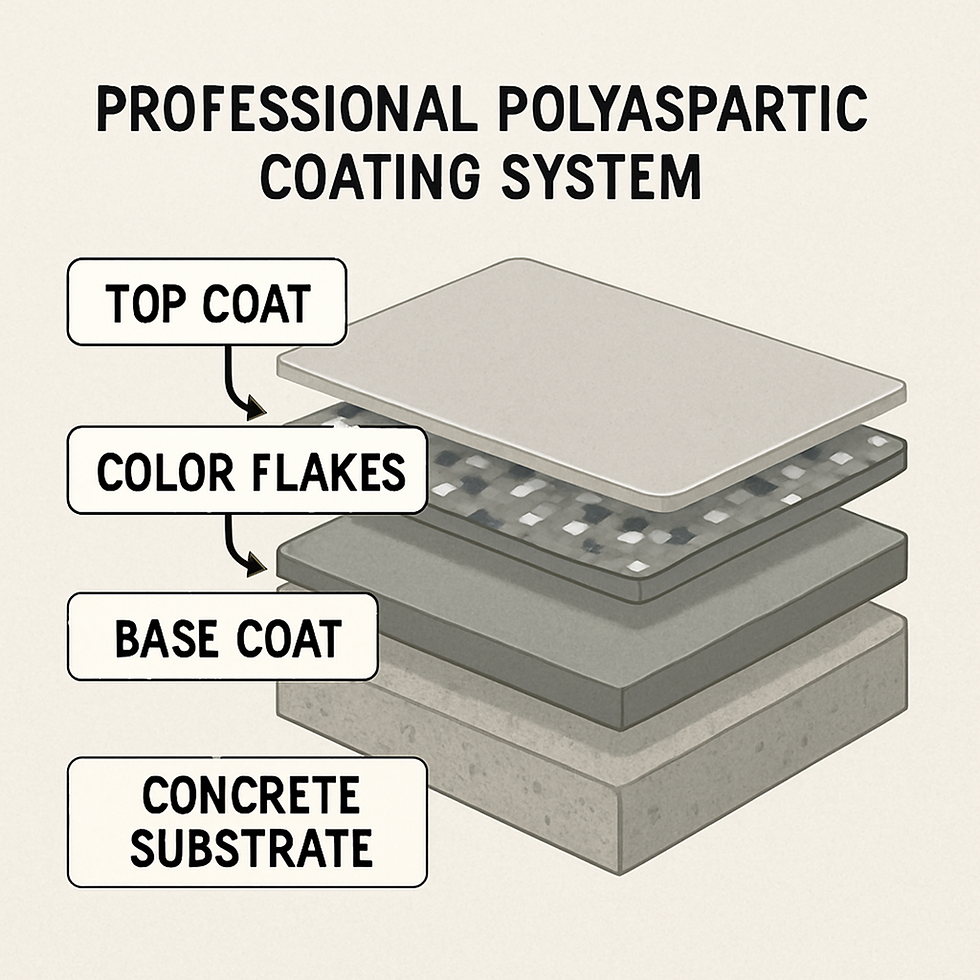
Worried about that smooth, glossy surface becoming slippery when wet? Installers solve this by scattering slip-resistant decorative flakes into the wet resin. These tiny chips add beautiful color patterns while creating a textured, sandpaper-like grip, perfectly balancing safety and style. Before grabbing a cheap package at the hardware store, you must evaluate why your DIY kit might peel and the vital difference between high-solids and water-based epoxy.
Why Your DIY Kit Might Peel: The Vital Difference Between High-Solids and Water-Based Epoxy
That affordable garage floor paint kit might seem like a quick weekend win, but it often leads to a frustrating problem known as "hot tire pick-up." When you park after a long drive, the heat from your tires softens that thin coating. As the rubber cools, it contracts and literally rips the epoxy right off the concrete. These budget, water-based kits roll on easily and cure fast, but they lack the heavy-duty armor necessary to handle daily driving.
The secret behind this durability gap is "solids content." This percentage tells you how much product actually stays on your floor after the chemical curing process finishes, rather than evaporating into the air. A 50% solids water-based epoxy loses half its volume as it hardens, leaving a paper-thin layer measured in "mils" (one mil is a thousandth of an inch). Alternatively, a 100% solids commercial grade epoxy floor kit shrinks zero percent, creating a rock-hard barrier three times thicker than budget options.
Selecting a high-solids professional garage floor epoxy guarantees a finish tough enough to survive dropped wrenches and heavy tool chests. Yet, even the thickest resin will fail if it has nothing to grab onto. The real secret is in the scratch: why diamond grinding and surface prep make or break your floor.
The Secret is in the Scratch: Why Diamond Grinding and Surface Prep Make or Break Your Floor
Pouring premium epoxy over smooth concrete is like trying to stick tape to a wet pane of glass. It simply won't hold. The resin requires a "mechanical bond" to lock into place permanently. Your floor must be intentionally roughened, creating thousands of microscopic peaks and valleys. Experts call this essential texture "profiling." It acts exactly like the hook side of Velcro, giving the thick liquid something to firmly grab onto as it hardens.
Achieving this sandpaper-like finish is the foundation of any reliable concrete surface preparation guide. While budget DIY kits often suggest using a mild acid wash, the most foolproof method is diamond grinding concrete floors. Renting a walk-behind grinder physically removes the smooth, sealed top layer, stripping away stubborn stains while opening the pores of your slab.
Texture alone isn't enough; you must also defeat an invisible enemy. Even a bone-dry garage has groundwater evaporating upward through the porous concrete. This invisible pressure acts like steam lifting a pot lid. Without proper moisture vapor transmission testing, this rising dampness will eventually push your beautiful new coating right off the concrete.
Protect your investment by following this strict four-step preparation checklist before opening your resin:
1. Degrease all oil spots to prevent chemical contamination.
2. Grind the surface to achieve a rough, porous profile.
3. Tape a plastic square down for 24 hours to check for trapped condensation.
4. Vacuum thoroughly to remove every speck of dust.
Once your canvas is properly prepped, you are finally ready to look beyond grey and design your space with decorative flakes and metallic mica pigments.

Beyond Grey: Designing Your Space with Decorative Flakes and Metallic Mica Pigments
Stepping onto a finished floor is a dramatic shift from staring at dull concrete. One immediate benefit of epoxy is how it transforms a room by bouncing light around. Creating high gloss seamless surfaces instantly brightens dim basements and gloomy garages. However, a shiny slab is just the baseline; the real magic happens when you introduce custom textures to hide everyday dirt.
Scattering acrylic vinyl chips into the wet resin creates a speckled appearance mimicking premium granite. These slip resistant decorative flakes do more than add visual interest. They act as expert camouflage, naturally masking dusty footprints and minor slab imperfections that a solid color would boldly highlight.
For a true showroom aesthetic, blending finely ground minerals into the resin produces stunning metallic mica pigment effects. As the epoxy cures, these powders swirl together to simulate flowing liquid marble. Beneath that beauty lies tough plastic armor ready to handle heavy tools, hot tires, and chemical spills.
Hard-Hitting Durability: How Industrial Epoxy Flooring Stands Up to Hot Tires and Chemical Spills
Standard painted floors easily chip under a dropped wrench, but epoxy acts as a tough suit of armor for your concrete. The secret to this durability is how it handles rapid temperature changes, a phenomenon known as thermal shock. When you park after a long summer drive, your hot tires essentially bake the floor below. Normal paint softens and peels away when you reverse the next morning. However, a true warehouse resin flooring system absorbs that intense heat without ever losing its grip on the concrete.

Beyond surviving physical heat, mixing the two chemical components triggers a process called cross-linking. Imagine a microscopic, impenetrable chain-link fence locking together. Because of this incredibly tight structure, chemical resistant floor treatments easily shrug off caustic fluids that would permanently ruin an untreated garage:
● Motor Oil: Sits safely on the surface for a quick wipe-up rather than soaking in.
● Brake Fluid: Eats through regular paint but harmlessly pools on an epoxy shield.
● Harsh Cleaners: Bleach and strong detergents wash away without dulling the gloss.
Upgrading to an industrial epoxy floor coating guarantees your space will withstand years of heavy-duty traffic. With the science keeping your floors protected clear, accurately budgeting the financial investment comes next.
Counting the Cost: What to Expect Per Square Foot for Professional vs. DIY Projects
Budgeting accurately starts with understanding the cost per square foot for resin floors. While standard commercial floor paint seems like a cheap weekend fix, a genuine two-part epoxy requires a slightly larger initial investment to achieve that armor-like finish.
Your final bill depends heavily on who handles the labor and crucial surface preparation. Here is a realistic breakdown of what you can expect to spend:
● DIY Kits: $1–$3 per sq. ft. (Lowest upfront cost, but carries a high risk of early peeling if prep is skipped).
● Basic Pro Install: $4–$7 per sq. ft. (Includes mandatory mechanical concrete grinding for a permanent bond).
● Decorative Pro Install: $8–$12+ per sq. ft. (Features premium full-flake textures or custom metallic swirls).
Evaluating the life-cycle cost proves that cheaper isn't always better. Professional installs easily outlast home kits because experts apply heavy-duty industrial concrete floor coatings. Paying for that expertise upfront helps you avoid the hidden costs of replacing a failed floor three years later. Protecting this resilient new surface requires a straightforward maintenance routine to make your resinous coating last for decades.
Keeping the Shine: A Maintenance Guide to Making Your Resinous Coating Last for Decades
Protecting your newly poured investment from dulling films is surprisingly easy. You might assume a tough surface needs harsh chemicals, but standard citrus or vinegar-based cleaners will actually eat away that brilliant gloss. Instead, stick exclusively to a simple pH-neutral cleaning solution mixed with warm water, which lifts spills without leaving a cloudy, chemical residue behind.
Everyday dust acts like microscopic sandpaper under your shoes and car tires. A quick weekly sweep with a soft-bristle broom removes this abrasive grit, answering the common question of how long do resinous coatings last. By simply keeping debris off the surface, maintaining industrial floor finishes becomes effortless, ensuring your floor stays beautiful for decades.
To extend the floor's life by up to 10 years, apply sacrificial wax coatings over your industrial strength floor sealants. This invisible layer acts as a easily replaceable shield, taking the daily scuffs so your pristine epoxy does not have to. Proper care guarantees your investment lasts, perfectly complementing a 48-hour transformation action plan to get the floor you deserve.
Your 48-Hour Transformation: A Step-by-Step Action Plan to Getting the Floor You Deserve
You no longer look at a concrete slab and see just a dusty surface; you see a canvas ready for a chemical marriage. Mastering the critical "Velcro" prep and navigating the choices between standard epoxy flooring, comprehensive garage floor coating systems, and top-tier polyaspartic vs polyurethane finishes arms you with the knowledge to build a permanent suit of armor for your concrete.
Transforming that bare concrete into a showroom masterpiece comes down to a simple, practical roadmap:
1. Test for moisture: Tape a plastic square to the floor to check for trapped water.
2. Tackle the prep: Decide whether to rent a grinder yourself or hire a pro to create that essential Velcro-like grip.
3. Mix precisely: Combine the resins exactly as directed to spark the chemical marriage.
4. Apply and decorate: Roll out your base coat and broadcast your aesthetic color flakes.
5. Respect the cure: Wait the full recommended time before driving your car onto the finished surface.
Your floor doesn't have to remain a forgotten, oil-stained zone. Grab some clear plastic and duct tape, and run that moisture test this weekend. It is the perfect first step toward transforming your dusty slab into an indestructible living space. Contact Raz-Barry Construction for professional concrete coating services in Volusia & Flagler Counties.


Comments